Cash is Good!

I have taken a part-time job, and it's definitely affecting my blogging time. I'll continue to post here as I am able.
Showing posts with label image tasks. Show all posts

Wednesday, November 2, 2011

Working Around Errors Uploading Images to Blogger


The extremely annoying problem of not being able to upload images with Blogger (discussed at Error Uploading Images to Blogger) can be worked around.

First open your Picasa page. Maybe you didn't know you have one. But if you've been using the blogger image uploader, you do. That's where they are stored. Go to this URL https://picasaweb.google.com/home . If you are logged into your Google account it will automatically bring up the various blogs you have under that ID. Click on the blog you want to add a picture to.

Then choose "Add Photos." I've circled it in the image below that shows my Picasa page for Grazing the Ditches


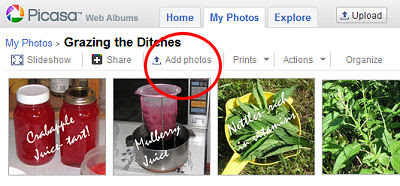
This will take you to a screen where you can either drag the image from your folder into a large box, or browse your files to find it. When the image (or several) shows in the box, click OK in the lower right corner. This will throw you back to the upload screen.

Now you need to get back to the album you want. The only way I've seen to do this is click on the Home tab, and then the Album for the blog I just added to. Once you have that open, the picture you just added should show in the thumbnails. Click on the image and it will open in a larger size. You can then right click and choose Copy Image Location (or whatever your browser calls it).

Paste this into your blog.

If you don't know how to code it to show up, follow this example: <IMG SRC="http://your-picture-url.jpg"> (or gif, etc. insert the correct URL for the image)

You can force it to align to the left or right by placing the following between IMG and SRC: ALIGN="LEFT" (or right)

These commands to not need to be in capital letters. I just did that to identify them as tags.

Of course it would be nice if the uploader would work, but this makes it possible to post when we are ready, not when Google decides to work.


Tuesday, February 8, 2011

Blogger Photo Uploader Rotates Pictures


A widespread problem is occurring when uploading photos through the Blogger/Blogspot platform. Pictures often auto-rotate to an orientation that you don't want. Efforts to resave the photo and upload again don't seem to do much. I uploaded this humorous shot three times for use on another of my blogs, and it simply refused to load in landscape mode.

There are many theories as to why this is happening, with no real answers. Google has pretty much ignored people's questions on their forum, since the issue was first reported in March of 2010.

Meanwhile, other users have suggested a number of ways to fix this, but only one of the suggestions really works consistently. Here is the best way to deal with the problem.

The way Blogger hosts your pictures is through a private Picasa Album. Using your Google ID, log into Picasa and click on My Photos. You will discover that each of your blogs (if you have more than one) has its own album. Click on the correct one.

You can then locate the picture that is rotated. Click on it, and it will expand. Then in the upper right corner you will see a button marked "Edit." Click it. This will launch the Picnik editing application. You can then rotate the photo to the way you want it to be. Save it back to your album.

Then you can right-click on the photo and get it's URL to use in your blog post. This is a ridiculous amount of work to deal with a problem that you didn't cause, but it's the only reliable solution.

If you are able to host your photos somewhere else, and not use the Blogger uploader at at, this would be the ideal solution.

Picasa
Blogger forum

Friday, November 26, 2010

Video Made in Windows Movie Maker Won't Upload to YouTube?


Have you edited or created a movie in Windows Movie Maker, tried to upload it to YouTube, and received the cryptic message "Unable to upload for unknown reason?" Yesterday, I learned one possible source of the problem. If you have created an extra audio track, such as a voiceover, read on.

When I went exploring for possible reasons why my video seemed to be uploading to YouTube just fine until the very end, I discovered that one possibility was that the audio and video tracks were not of the same length.

After a lot of fooling around, trying unsuccessfully to get my voiceover track and the dual video/audio track from the camera to end at the same 100th of a second, I tried another solution, and this one worked.


This is what the timeline will look like when there is a problem. My voiceover track is the bottom bar. Note that it extends beyond the camera track. Your video will play perfectly on your computer, but YouTube won't take it.


To fix this problem, just leave the camera video/audio track a little longer. Those tracks are synced internally, and will always end at the exact same time. I managed to achieve this by inserting another tiny clip of film, which you can see, just before 1:58:00 on the timeline. The timeline is expanded, so this clip is only about 1/10 second long, but it made all the difference. YouTube accepted the video in which the camera track was longer than the voiceover track.

Windows Movie Maker is an extremely basic video editing software, but, even so, good things can be accomplished with it.

Sunday, November 22, 2009

Using Windows Picture and Fax Viewer


Windows Picture and Fax Viewer is a very handy application that I often forget about using. I thought if I reminded you about it, it would help me remember too!

Any computer with Windows XP or 2003 has it installed. In Windows Vista it has been replaced with the similar Windows Photo Gallery. It is not software for editing, but just an easy way to see the images in a folder, at a decent size, without opening editing software.


You can view the images in any folder which contains images. Acceptable formats include jpg, gif (including animated), bmp, png, wmf, emf, ico, and tiff. Open the desired folder. It doesn't matter what view is selected (eg. thumbnails, list, etc). Select any image and right click, then choose Open With/ Windows Picture and Fax Viewer. The viewer will open and you can scroll through the images that are in that folder.


There can be files in the folder that aren't images, and the viewer will ignore them. In the screen capture here you can see that I'm about to view any images that are lost on my too-busy desktop- an easy way to find an image.

Within Windows Picture and Fax Viewer you can view pictures with the best fit to the screen, make them full size, or zoom in and out. You can rotate images. You can print, save with the same or a different name, and delete images. Another choice is to close the viewer and open the image with your default image editing software.

Supposedly, in the My Pictures folder if you simply double-click on a photo file the viewer will automatically open. This may not be true. For me, a double-click just opens my photo editing program. But you can always do the right-click and Open With option.

See Microsoft Documentation for the Picture and Fax viewer.

web ad income Nov 20 (4 blogs, 2 web sites, writing):
Adsense $.01
Adgitize $.69
Project Wonderful $.04
Clixsense $.06
Neobux $.06
Microworkers $1.60
______________________
Total: $2.46

Thursday, November 12, 2009

Sorting Pictures from Various Sources

Have you been given the task of sorting the digital pictures of an event from several cameras? Would you like to put them in chronological order? It's easy in Windows files, but you have to follow a few steps that may not be totally obvious.

When you open a file folder in Windows the default sort order is usually by name. With only one camera, the files will probably be chronological because the camera numbers them in sequence. But if the images came from multiple sources, they will probably appear in blocks by the camera used.


No matter what view you are in, you need to switch to Details- see first picture. Then right click anywhere on the bar where the words Name/ Size/ Type, etc and you will see the view shown below.


You need to find the choice "Date Picture Taken," which probably won't show in the list you see, so you'll need to select More from the bottom of the list. This will bring you to what you see below.


Note that I've scrolled down in the list to make "Date Picture Taken" visible as an option. Check it. (If you want to use the Move Up button to put it near the top of the list you can, but it's not necessary.) Click OK.

If you moved it up, say to the second spot you will now have the view shown below.


If you didn't move it up, simply widen the window till you can see it. If you want, you can left click on the header and drag that column over beside the name. Then click on the header until the little gray arrow points up. The file is now sorted from oldest to newest. You can see it the final image here that the files are sorted by date and time, not by the name (note the mixed names near the end of the list).


web ad income Nov 10 (4 blogs, 2 web sites, writing):
Adsense $.02
Adgitize $.57
Project Wonderful $.04
My Survey $.05
Clixsense $.11
Neobux $.04
______________________
Total: $.83

Sunday, July 5, 2009

Image Problems in Firefox 3.5 beta


Are you having troubles with some websites displaying properly in the beta version of Firefox 3.5? The problem may be with blocked images.

In fact, even with FF 3.xx, you have the ability to block images on specific sites rather than universally.

There are two ways to access these settings. One way is through the Tools / Options / Content. Then be sure that Load Images Automatically is checked. Note that you can click on exceptions to see if there are any sites which have been individually flagged to not load the images. Apparently with FF 3.5 beta, some people are having certain sites flagged as exceptions without knowing how it happened. Until the bugs are fixed, you may need to manually change the settings.

You can also get to this information by clicking on the favicon at the left end of the address bar. This will drop down a small box. Click on More Information. Then click on Media in the box that opens and you will see the following screen:

You can then scroll any of the choices associated with that particular site. If you select one then you can check the box, or not, to block images.

This can be a handy feature to make some sites that are overloaded with useless images easier to navigate.

Monday, April 27, 2009

Using Microsoft Image Properties


You can help organize your pictures without purchasing any fancy software if you make use of the Image Properties functions on any Windows PC. A great deal of information about the picture will already be embedded with it, but you can add descriptions, title, author (photographer), and most interestingly keywords which will tag the photo in a search.


From any file folder that contains images chose one and right click, then select properties. The list I am showing is in text, but you might have the thumbnails displayed. That doesn't matter.


On the General tab you can change the name of the image in case you haven't already named it something other than the camera-assigned number. Don't forget to leave the extension, this will not be added automatically! Notice all the information held here- when the file was created, its size and any time it was modified or accessed.


On the Summary tab, things get interesting! Add another title if you like, subject and author. These are all optional. Sometimes I do this, sometimes not.

The part I really like is keywords. This is like having the ability to place one image in several file folders or categories. Let's say you have a picture of a stunning scarlet maple leaf. Keywords might be red, trees, autumn, color, maple, leaves. Sometime, months later you would like to find all your pictures of maples. From the Windows start menu, click "Search," and then photos. Add the word "maple" to your search field, and all the photos that you have tagged with the keyword "maple" will be located!

In the Comments field you can give more detail. I like to use this to include more specific information about a picture. To continue to maple leaf example I might say "Tree in the SW corner of Mr. Smith's field." If I have two or more shots that I want to keep of the same thing I might add something like "full leaf" or "closeup of veins." Information like this is useful when it's hard to tell two thumbnail images apart and you don't want to bother to open the image to full size.


Finally, if you click the Advanced button from the General tab, you can see lots of detailed information about the image such as f-stop, shutter speed, resolution, and much more.

web ad income today (4 blogs, 2 web sites):
Adsense $.83
Adgitize $.83
Project Wonderful $.02
______________________
Total: $1.68
Total to date in April $15.78
Total in March $4.88